Blogs
Terraform for beginners - AWS
Terraform for AWS — Beginners
Terraform for AWS- Beginners is an attempt to quickly explain how to use Terraform for provisioning AWS basic resources for beginners. It is however recommend to have some understanding on AWS Services and some hands-on, try simple examples from my Blogs before trying out on Terraform code.
By definition Terraform is a tool to provision, maintain and manage infrastructure via Infrastructure as code (IaC). There are many other open source tools like Ansible, Chef, Puppet, etc which could nearly do more or less of what Terraform does.
Why is Terraform so popular?
- It is an open source tool with a strong community backup.
- It supports multiple cloud providers with ease.
- Terraform is more of Infra proivsion tool and others open source tools like Ansible are quite handy for software configuration.
- Terraform clearly understands the state of the provisioned infrastructure. Like if you have already provisioned 10 EC2 instances and if you want to provision another 10, you need to just update the existing terraform code to 20 instead of writing a new code with 10.
- Agentless (ie) you dont need to install any agents on the target server.
- You can write the code to provision services in any order, Terraform is intelligent enough to order and provision them.
- Terraform manages state, which will be very ease for you in future infrastructure changes or management. Which means you can run the same script again and again but only the updates or changes will be applied.
- Building AWS infrastructure using Terraform is even simpler than using AWS Cloud Formation.
Lets get started.
What you will need here to perform the coding for Terraform on AWS,
- AWS account with a user to perform CLI with full admin rights preferably, for ease.
- Download and Save the access key & secret key of the above CLI User, which will be later exported for running terraform commands.
- Download the Terraform executable from terraform.io website.
I have carried out this tutorial on windows-power shell.
Downloading and installing Terrorm on your local machine.
By default when you download Terraform, it is a zip file format for any OS.
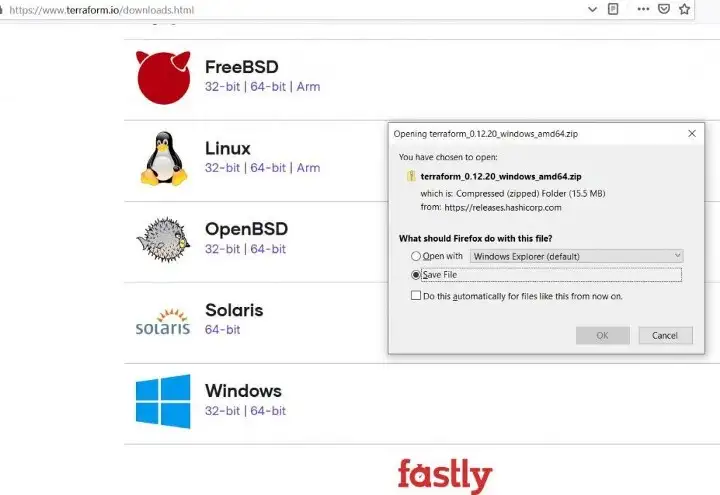
Terraform Download
At the time writing , terraform version downloaded — v0.12.18.
Depending upon OS-Machine download the executable and place in a location. If you are using windows then configure the environment path as below.
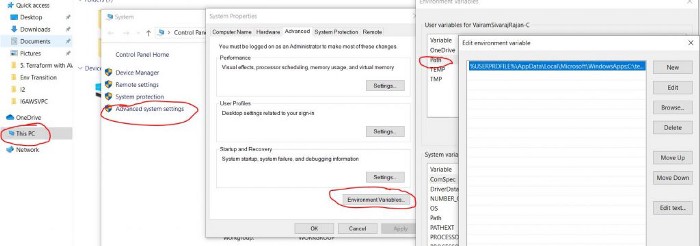
Terraform Environment Variable Setting
Once you have placed and set the environment path, the first command you can run and confirm is terraform version.
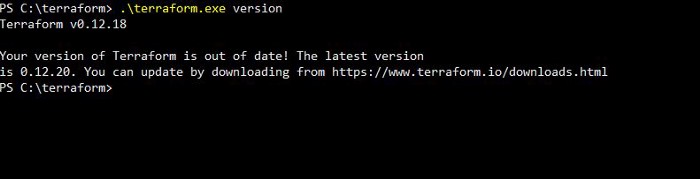
Terraform version
You can also refer here for installing Terrafom from hashicorp for different OS’s.
Before getting into building the AWS infrastructure, we will discuss on some of Terraform Basic commands,
- init — This should be the first command executed whenever you provision a new infrastructure.
This will initialize values based on cloud provider you are going to use and download the required code for executing rest of terraform code. It then places downloaded files under a directory by name ‘.terraform’. - Plan — This command will show what your terraform script is actually going to perform without making any changes. You can run terraform plan command again and again to see the changes. It can compare the existing running instance resource state with your modified terraform code, with which you can easily identify the additions or changes or deletions you are making to already provisioned resources.
- apply — This will execute your terraform script and thereby actually provisioning the required infrastructure. This will also show the same plan output as terraform plan command and then asks a question ‘do you want apply the changes’ when you give yes it will go ahead and create the resources.
- refresh — terraform refresh command is used to reconcile the state file with the actual infrastructure. ‘terraform.tfstate‘ is a terraform State file created by Terraform automatically after the resources are provisioned and it will have resource details like resource name, tag, type, id,etc.
This can be used to detect any drift from the last-known state. If any update to the state file is needed, incases where manual update happened via AWS console, this refresh command automatically updates the ‘terraform.tfstate’. - validate — This will validate the terrform code, however not the resources it is about to create. For example it doesn’t check if the ami exists or not in AWS cloud, but will check for AMI variable is assigned at code level.
- import — This command will get/download the already existing infrastructure setup as a .tf code to location of your choice.
- graph — Order in which resources should be created. will be represent here as ‘digraph’ json file. Use
‘http://dreampuf.github.io/GraphvizOnline’ to represent as flow chart.
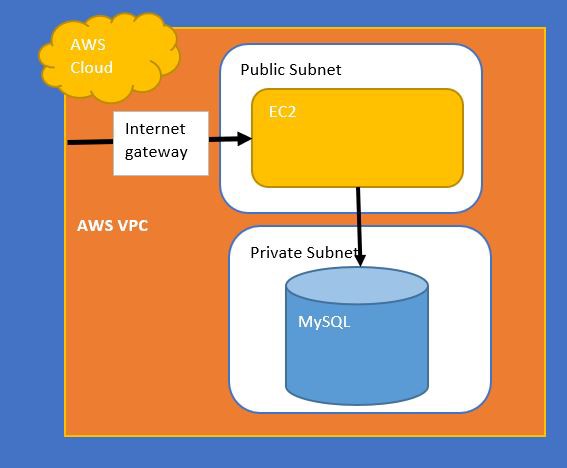
In this post you will be provisioning below services @ AWS using Terraform,
- VPC.
- Subnets
- Public Subnet for hosting application server — EC2.
- Private Subnet for DB server — mysql RDS.
- Two Security group for Application server access and Database Server each.
Below is a simple representation of the same.
Terraform on AWS
Starting with Terraform
All Terraform file/code should have extension .tf.
Any .tfvars file extension by convention should have keys or passwords or secrets and this should not be checked-in / pushed to source control.
Make sure all your files are placed under same directory/folder for terraform to pick and process.
Have your AWS user’s Access Key and Secret Access key downloaded and stored locally. Create a new file secret.tfvars and assign them to terraform variable as below. Note this file should not be uploaded to github so Add it to .gitignore.
AWS_ACCESS_KEY = “XXXXXXXXXXXXXXXXXXXX”
AWS_SECRET_KEY = “ZZZZZZZZZZZZZZZZZZZZ/XXXXXXXXX”
Alternatively you can export the access key and secret key before running the terraform command as below,
export AWS_ACCESS_KEY_ID= XXXXX
export AWS_SECRET_ACCESS_KEY= XXXXX
The code can start by first identifying the Cloud Provider, in your case it is AWS. You can have this coded in a separate file, called as provider.tf or you can have it in your main.tf. In this example most of the code is written inside main.tf as a convention. Entire code set can be found from my github repository.
Git repositoy : Source Code
#Version of the terraform terraform { required_version = “>= 0.12” } #Define the cloud provider here provider “aws” { region = var.AWS_REGION }
#Version of the terraform
terraform {
required_version = “>= 0.12”
}
#Define the cloud provider here
provider “aws” {
region = var.AWS_REGION
}
Note here var.AWS_REGION is variable stored in a separate file called vars.tf. By convention most of the variable with values or default can be coded under vars.tf. The value of region is coded as below inside vars.tf
variable “AWS_REGION” {
default = “us-east-1”
}
Here you are specifying the provider as ‘AWS‘ and setting the default region to ‘us-east-1‘.
Once you have coded above, you are good to run your first command on terraform which is terraform init.
Terraform init
This is the first command that should be run. This will initialize values of cloud provider, in your case AWS and download the required code to interact between Terraform code and AWS Api’s. The required files will be downloaded and placed under a folder by name ‘.terraform’.
During anytime of your coding, you can issue another terraform command called ‘terraform plan’ to see what your code is going to provision.
./terraform plan
This will show the entire list of resource and number resource that will be created or changed or destroyed.
AWS Resource Creation using Terraform
Create VPC:
Create a VPC with ip range of “10.0.0.0/16”. When you create VPC under terraform every single service you need to manually code it, nothing will be defaulted.
# Define VPC resource “aws_vpc” “main-terraform-vpc” { cidr_block = “${var.VPC_CIDR}” instance_tenancy = “default” enable_dns_support = “true” enable_dns_hostnames = “true” enable_classiclink = “false” tags = { Name = “main-terraform-vpc” } }
# Define VPC
resource “aws_vpc” “main-terraform-vpc” {
cidr_block = “${var.VPC_CIDR}”
instance_tenancy = “default”
enable_dns_support = “true”
enable_dns_hostnames = “true”
enable_classiclink = “false”
tags = {
Name = “main-terraform-vpc”
}
}
Above code creates VPC with name ‘main-terrraform-vpc’ with IP from var.VPC_CIDR written inside vars.tf file as below,
variable “VPC_CIDR” {
default = “10.0.0.0/16”
}
Create Public and private subnets
# Subnets
resource “aws_subnet” “main-public-1” {
vpc_id = aws_vpc.main-terrraform-vpc.id
cidr_block = “${var.PUB_CIDR}”
map_public_ip_on_launch = “true”
availability_zone = “us-east-1a”
tags = {
Name = “main-public-1”
}
}
resource “aws_subnet” “main-private-1” {
vpc_id = aws_vpc.main-terrraform-vpc.id
cidr_block = var.PVT_CIDR
map_public_ip_on_launch = “false”
availability_zone = “us-east-1a”
tags = {
Name = “main-private-1”
}
}
Subnets IP address will be referred from the vars.tf file as below,
variable “PUB_CIDR” {
default = “10.0.1.0/24”
}
variable “PVT_CIDR” {
default = “10.0.4.0/24”
}
Internet Gateway
Create an internet gateway and attach to the above VPC.
# Internet GW
resource “aws_internet_gateway” “main-igw” {
vpc_id = aws_vpc.main-terrraform-vpc.id
tags = {
Name = “main-igw”
}
}
Here the VPC id will be automatically derived from aws_vpc.main-terrraform-vpc.id at run time or during the actual creation of services.
Route Tables
Create the route tables and attach it with the above internet gateway and VPC.
# route tables
resource “aws_route_table” “main-public” {
vpc_id = aws_vpc.main-terrraform-vpc.id
route {
cidr_block = “0.0.0.0/0”
gateway_id = aws_internet_gateway.main-igw.id
}
tags = {
Name = “main-public-1”
}
}
Now this Route table need ot be associated to Public subnet as below,
# route associations public
resource “aws_route_table_association” “main-public-1-a” {
subnet_id = aws_subnet.main-public-1.id
route_table_id = aws_route_table.main-public.id
}
Security Groups
Create two security groups;
1. Public Security group for application server.
2. Private security group for RDS.
You can have a seprate file called securitygroup.tf or write the entire security group code inside main.tf. I have used a separate file called securitygroup.tf .
Public Security Group code as below,
- Refer the VPC
- Allow all for ease by cidr_blocks = [“0.0.0.0/0”]
Code:
resource “aws_security_group” “public-sg” { vpc_id = aws_vpc.main-terrraform-vpc.id name = “public-sg” description = “security group that allows ssh and all egress traffic” egress { from_port = 0 to_port = 0 protocol = “-1” cidr_blocks = [“0.0.0.0/0”] } ingress { from_port = 22 to_port = 22 protocol = “tcp” cidr_blocks = [“0.0.0.0/0”] } tags = { Name = “public-sg” } }
resource “aws_security_group” “public-sg” {
vpc_id = aws_vpc.main-terrraform-vpc.id
name = “public-sg”
description = “security group that allows ssh and all egress traffic”
egress {
from_port = 0
to_port = 0
protocol = “-1”
cidr_blocks = [“0.0.0.0/0”]
}
ingress {
from_port = 22
to_port = 22
protocol = “tcp”
cidr_blocks = [“0.0.0.0/0”]
}
tags = {
Name = “public-sg”
}
}
Below is the code for Private security group,
resource “aws_security_group” “rds-sg” {
vpc_id = aws_vpc.main-terrraform-vpc.id
name = “rds-sg”
description = “security group that allows RDS Secure access”
egress {
from_port = 0
to_port = 0
protocol = “-1”
cidr_blocks = [“0.0.0.0/0”]
}
ingress {
from_port = 3306
to_port = 3306
protocol = “tcp”
# cidr_blocks = [“0.0.0.0/0”] incase if you struggle to access RDS, remove below line and uncomment this line.
security_groups = [aws_security_group.public-sg.id] # allowing access from our example instance
}
tags = {
Name = “my-rds-sg”
}
}
Now we have all in set to create the instances.
Before creating instance, create a public key to launch the ec2 instance as below,
Run the below script to generate locally,
ssh-keygen
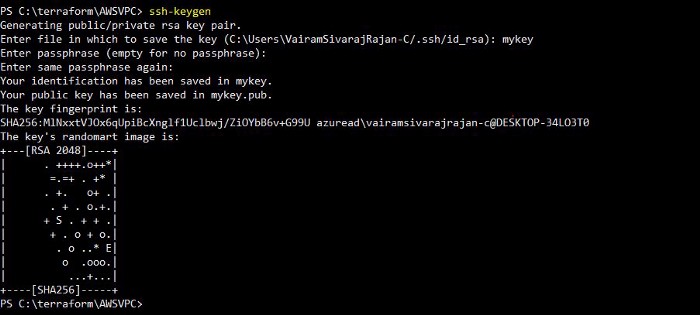
sshkey gen
EC2 using Terraform
Before creating EC2 instance, map the above generated public key in the EC2 creation code. Below code is added inside main.tf
#AWS Keypair to connect to aws ec2
resource “aws_key_pair” “mykeypair” {
key_name = “mykeypair”
public_key = file(var.PATH_TO_PUBLIC_KEY)
}
Here ‘file’ code will look for the mentioned file name in the specified directory if not current directory the retrieve the value of it.
var.PATH_TO_PUBLIC_KEY is assigned inside vars.tf file with the above generated ssh public key.
variable “PATH_TO_PUBLIC_KEY” {
default = “mykey.pub”
}
Now you can create the EC2 instance with above created vpc , public subnet , public security group and the keypair.
Create a new file called instance.tf for provisioning ec2 and RDS resources.
resource “aws_instance” “terr-ec2-instance” {
ami = var.AMIS[var.AWS_REGION]
instance_type = “t2.micro”
# the VPC subnet to be attached
subnet_id = aws_subnet.main-public-1.id
# the security group to be attached
vpc_security_group_ids = [aws_security_group.public-sg.id]
# the public SSH key ssh to access the server
key_name = aws_key_pair.mykeypair.key_name
}
Terraform for RDS
Create the Mysql RDS instance as below,
Note: password is hardcode here, just for ease. You can also store in a separate tfvars file and refer the variable here.
Code:
resource “aws_db_instance” “my-test-sql” {
instance_class = var.DB_INSTANCE_CLASS
engine = “mysql”
engine_version = “5.7”
multi_az = “false”
storage_type = “gp2”
allocated_storage = 20
name = “mytestrds”
username = “admin”
password = “admin123”
apply_immediately = “true”
backup_retention_period = 10
backup_window = “09:46–10:16”
# db_subnet_group_name = “${aws_db_subnet_group.my-rds-db-subnet.name}”
# vpc_security_group_ids = [aws_security_group.rds-sg.id]
skip_final_snapshot = true
}
By now you should have coded all that required to setup an vpc and to launch EC2 & RDS. You should have the following terraform source code files,
- main.tf
- vars.tf
- securitygroup.tf
- instance.tf
- secret.tfvars
Now you are ready to run the terraform scripts.
Terraform init
Terraform init should be run first, which will initialize the values of cloud provider, in your case AWS and dowload the required code to interact between Terraform and AWS Api’s. The required files will be placed under a directory called as ‘.terraform’
- terraform init
Terraform init
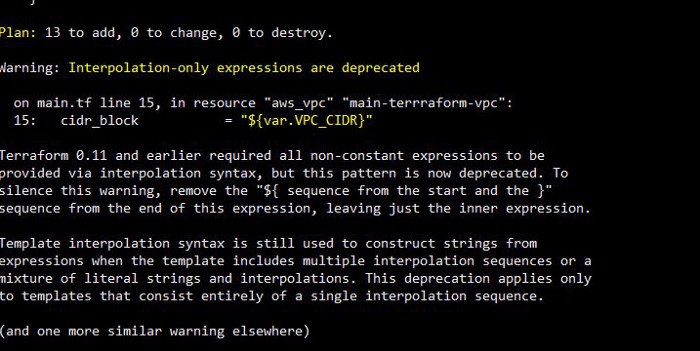
Terraform Plan
Run Terraform Plan to see list of actions that would be performed by your code.

terraform plan 1
Terraform plan 2
By end of Terraform plan you can see the list of resources to added (+) , number of resource to be destroyed (-) and number of resources to be updated. In your case it will be ’13 to add’ and .
Terraform Graph
You can run ‘terraform graph’ to see the order of resource creation.
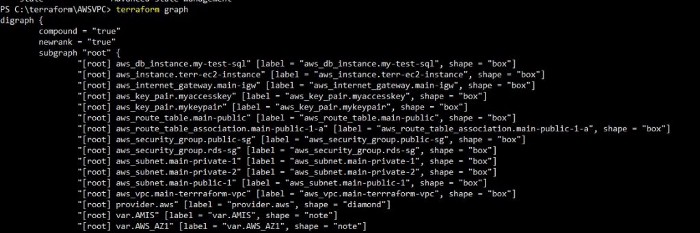
terraform graph
You copy paste this terraform graph output in “http://dreampuf.github.io/GraphvizOnline/” to see in pictorial representation.
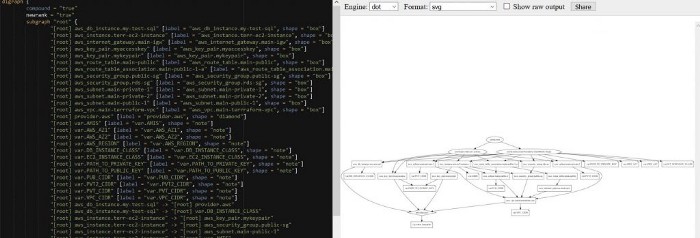
Terraform Graph
Terraform Apply
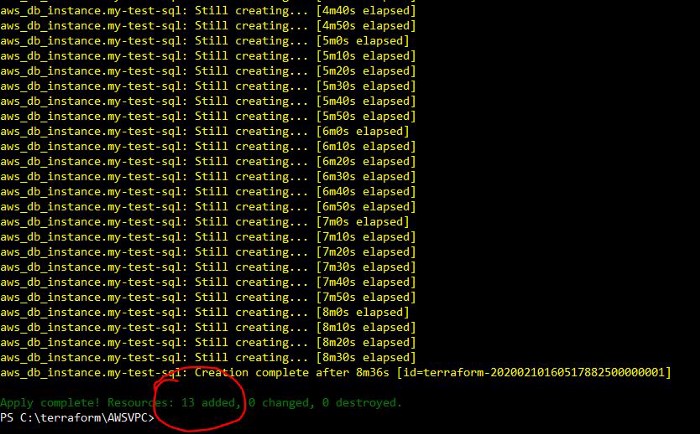
Once you have reviewed your plan, now you can go ahead and provision the infrastructure by running ‘terraform apply’ command. Since we are provisioning RDS, it might take more than 10 minutes to provision the entire infrastructure. Once terraform apply command is run without any errors, you can find a new file created by name ‘terraform.tfstate’ which will hold the state of each resource which got created. This should be saved forever properly till the resources are destroyed and try not to manipulate this file. Then on everytime we run plan or apply, this file will be referenced to compare against the already provisioned resources.

Terraform Apply

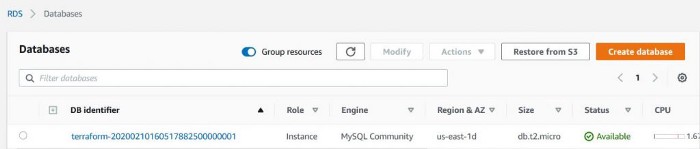
Now log into AWS console and check for the resoruces.
VPC:

Terraform AWS VPC

Subnets

Terraform AWS Subnets

Terraform AWS Route Table
Terraform AWS Ig

Terraform AWS Security Group
Terraform AWS EC2

Terraform AWS RDS
Now that you have verified all your resource from AWS console. We will make a small change to the Terraform code and see how it works.
Change is to add a ‘Tag’ name to your EC2 instance. Remember there was no Tag name attached to your EC2 instance.
Below is the code for the same,
resource “aws_instance” “terr-ec2-instance” { ami = var.AMIS[var.AWS_REGION] instance_type = “t2.micro” # the VPC subnet to be attached subnet_id = aws_subnet.main-public-1.id # the security group to be attached vpc_security_group_ids = [aws_security_group.public-sg.id] # the public SSH key ssh to access the server key_name = aws_key_pair.mykeypair.key_name tags = { Name = “HelloTerraform” } }
resource “aws_instance” “terr-ec2-instance” {
ami = var.AMIS[var.AWS_REGION]
instance_type = “t2.micro”
# the VPC subnet to be attached
subnet_id = aws_subnet.main-public-1.id
# the security group to be attached
vpc_security_group_ids = [aws_security_group.public-sg.id]
# the public SSH key ssh to access the server
key_name = aws_key_pair.mykeypair.key_name
tags = {
Name = “HelloTerraform”
}
}
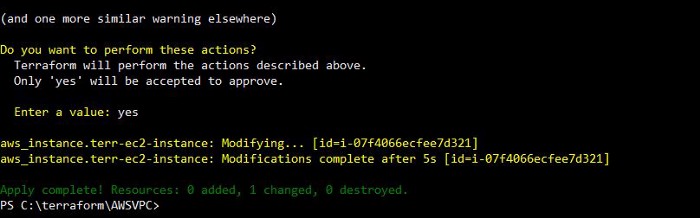
Run Terraform plan, it will clearly say ‘1 to change’ as below,
Terraform Plan Change
Now Run Terraform apply,
Terraform AWS EC2 change
Terraform Destroy
It is a good idea to clean up the infrastructure as provisioned by Terraform using Terraform destroy command. It is very simple and easy to clean up using script as the state of each resource is stored inside terraform.tfstate file .
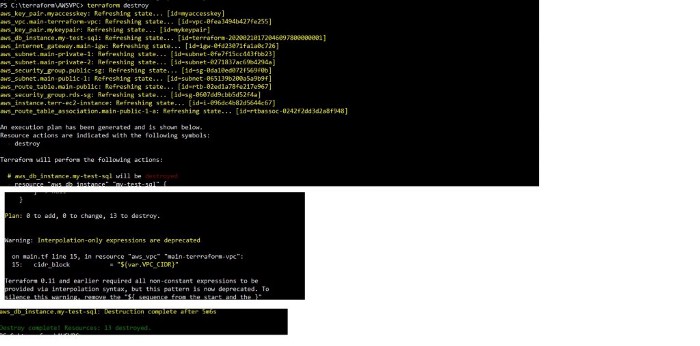
Terraform AWS destroy
Once destoryed, it is not possible to reverse the action.
Conclusion:
By now you should have got a basic idea about Terraform in creating AWS service. There is a lot of which you have implicitly learnt here like terraform variables. You have mostly used here complex data types like list and map. I planning to write a separate post on terraform variables.
Few Terraform Advance Topics which i will also try to cover in my next post on ‘Terraform on AWS for Beginners’ like,
- Terraform remote state
- Reusable Terraform modules
- Terraform backend
- Terraform workspaces.